How to Remove Moisture from Walls So It Never Comes Back
Moisture on walls isn’t just a cosmetic issue — it can lead to mold growth, damage to your home’s structure, and even impact your health. If you’re tired of damp patches, peeling paint, or that musty smell in your house, don’t worry. With the right steps, you can not only remove moisture from your walls but also make sure it never comes back.
Here’s a complete guide to solving the problem once and for all.
Step 1: Identify the Source of the Moisture
Before you treat the symptoms, you must find the cause. Moisture can enter your walls in several ways:
- Leaky pipes inside walls
- Roof or gutter leaks
- Poor ventilation, especially in bathrooms or kitchens
- Cracks in exterior walls
- Rising damp from the ground (common in older homes)
Inspect all possible areas, including attics, basements, and around windows. Fixing the source is the first key step.
Step 2: Remove Existing Moisture
Once the source is fixed, it’s time to dry out the wall:
What to do:
- Use a dehumidifier in the affected room for several days.
- Keep windows open during the day to let fresh air circulate.
- Point a fan directly at the wall to speed up drying.
- For deep damp, use a moisture absorber, like calcium chloride or silica gel packs, placed near the wall.
Check progress by touching the wall or using a moisture meter — the surface should feel dry to the touch before proceeding.
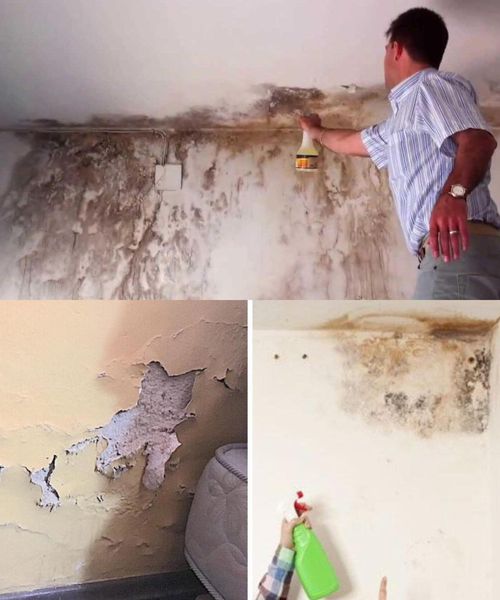
Step 3: Treat the Wall Against Mold and Stains
Even after drying, damp walls can leave behind mold spores or stains.
How to clean:
- Mix 1 cup of bleach with 1 liter of water.
- Scrub the affected area with a sponge or brush.
- Let it sit for 15–20 minutes, then rinse and dry.
For a natural option, use white vinegar or hydrogen peroxide — both are effective against mold.
Step 4: Seal and Protect the Wall
After treating and cleaning, it’s time to protect the wall from future damage:
- Apply a waterproofing primer or anti-damp sealant.
- Use water-resistant paint for the final coat.
- If your home is prone to rising damp, install a damp-proof membrane or injection cream barrier in the wall.
These solutions create a barrier that stops moisture from penetrating again.
Step 5: Improve Long-Term Ventilation and Drainage
Even the best treatments will fail if your home remains too humid.
Tips for lasting protection:
- Install exhaust fans in kitchens and bathrooms.
- Use dehumidifiers during wet seasons.
- Keep furniture slightly away from walls to allow airflow.
- Clean gutters and check for drainage issues around the foundation.
- Consider adding wall insulation if condensation is a problem in winter.
With these steps, you can finally say goodbye to moisture problems and keep your home clean, dry, and healthy. Regular maintenance and awareness are key to preventing the return of moisture — make it a part of your seasonal home checklist.
If this guide helped you, don’t forget to like, share, and spread the word! Someone else might be fighting wall dampness right now and needs to see this. 🛠️🏡💧